本章的主题是重中之重!大多数应用都需要持久化存储数据,并高效地执行的增删查改的操作,数据库 为此而生。
我们将第一次引入第三方库 Gorm 来帮助我们实现 ORM
本章的GitHub链接为: Source , Diff , Zip
数据库及ORM选择
数据库被划分为两大类,遵循关系模型的一类是 关系数据库
,另外的则是 非关系数据库
,简称 NoSQL
,表现在它们不支持流行的关系查询语言SQL。这里我们打算使用的是 mysql
, 这是一种非常流行的关系型数据库,也应该是应用最广泛的数据库了。
ORM我们选用Gorm
, 应该是因为它的Star数遥遥领先吧。
首先我们利用下面的命令安装 Gorm
Copy go get -u github.com/jinzhu/gorm
数据库模型
定义数据库中一张表及其字段的类,通常叫做数据模型。ORM (Gorm) 会将类的实例关联到数据库表中的数据行,并翻译相关操作
id字段通常存在于所有模型并用作主键。每个用户都会被数据库分配一个id值,并存储到这个字段中。大多数情况下,主键都是数据库自动赋值的,我只需要提供id字段作为主键即可。
user表: username,email和password_hash字段被定义为字符串(数据库术语中的VARCHAR),并指定其最大长度,以便数据库可以优化空间使用率。 username和email字段的用途不言而喻,password_hash字段值得提一下。 我想确保我正在构建的应用采用安全最佳实践,因此我不会将用户密码明文存储在数据库中。 明文存储密码的问题是,如果数据库被攻破,攻击者就会获得密码,这对用户隐私来说可能是毁灭性的。 如果使用哈希密码,这就大大提高了安全性。 这将是另一章的主题,所以现在不需分心。
post表: 将具有必须的id、用户动态的body和timestamp字段。 除了这些预期的字段之外,我还添加了一个user_id字段,将该用户动态链接到其作者。 你已经看到所有用户都有一个唯一的id主键, 将用户动态链接到其作者的方法是添加对用户id的引用,这正是user_id字段所在的位置。 这个user_id字段被称为外键。 上面的数据库图显示了外键作为该字段和它引用的表的id字段之间的链接。 这种关系被称为一对多,因为“一个”用户写了“多”条动态。
另外 我们后续还会有粉丝这种多对多的关系
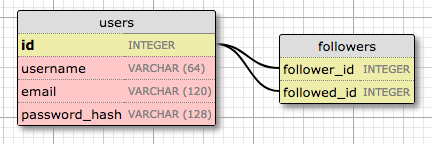
model/user.go
Copy package model
// User struct
type User struct {
ID int `gorm:"primary_key"`
Username string `gorm:"type:varchar(64)"`
Email string `gorm:"type:varchar(120)"`
PasswordHash string `gorm:"type:varchar(128)"`
Posts [] Post
Followers [] * User `gorm:"many2many:follower;association_jointable_foreignkey:follower_id"`
}
Notice: 此处应该是gorm:"type:varchar(64)"
当时写的Github源码有错,不过只影响建表时的varchar size,请注意
model/post.go
Copy package model
import (
"time"
)
// Post struct
type Post struct {
ID int `gorm:"primary_key"`
UserID int
User User
Body string `gorm:"type:varchar(180)"`
Timestamp * time . Time `sql:"DEFAULT:current_timestamp"`
}
model/g.go
Copy package model
import (
"log"
"github.com/bonfy/go-mega-code/config"
"github.com/jinzhu/gorm"
)
var db * gorm . DB
// SetDB func
func SetDB (database * gorm . DB ) {
db = database
}
// ConnectToDB func
func ConnectToDB () * gorm . DB {
connectingStr := config. GetMysqlConnectingString ()
log. Println ( "Connet to db..." )
db, err := gorm. Open ( "mysql" , connectingStr)
if err != nil {
panic ( "Failed to connect database" )
}
db. SingularTable ( true )
return db
}
其实如果作为演示项目,我们可以将connectingStr := config.GetMysqlConnectingString()
直接写入实际的演示数据库地址,不过为了追求和实际项目中的将配置文件单独放置的效果,我们还是将实际项目中的方法演示给大家。
多引入一个第三方package github.com/spf13/viper
Copy go get -u github.com/spf13/viper
设置 config 文件, config.yml
, 可以放在项目目录下 (实际 Source Code 中 git ignore 了实际的 config.yml, 存放了 config.yml.sample)
config.yml
Copy mysql:
charset: utf8
db: go-mega
host: localhost
password: password
user: root
config/g.go
Copy package config
import (
"fmt"
"github.com/spf13/viper"
)
func init () {
projectName := "go-mega"
getConfig (projectName)
}
func getConfig (projectName string ) {
viper. SetConfigName ( "config" ) // name of config file (without extension)
viper.AddConfigPath(".") // optionally look for config in the working directory
viper.AddConfigPath(fmt.Sprintf("$HOME/.%s", projectName)) // call multiple times to add many search paths
viper. AddConfigPath (fmt. Sprintf ( "/data/docker/config/ %s " , projectName)) // path to look for the config file in
err := viper. ReadInConfig () // Find and read the config file
if err != nil { // Handle errors reading the config file
panic (fmt. Errorf ( "Fatal error config file: %s " , err))
}
}
// GetMysqlConnectingString func
func GetMysqlConnectingString () string {
usr := viper. GetString ( "mysql.user" )
pwd := viper. GetString ( "mysql.password" )
host := viper. GetString ( "mysql.host" )
db := viper. GetString ( "mysql.db" )
charset := viper. GetString ( "mysql.charset" )
return fmt. Sprintf ( " %s : %s @tcp( %s :3306)/ %s ?charset= %s &parseTime=true" , usr, pwd, host, db, charset)
}
由于 Go 是编译型语言,我们不能像 Python 那样可以逐行的调试演示,我们就直接编写个程序,初始化表
cmd/db_init/main.go
Copy package main
import (
"log"
"github.com/bonfy/go-mega-code/model"
_ "github.com/jinzhu/gorm/dialects/mysql"
)
func main () {
log. Println ( "DB Init ..." )
db := model. ConnectToDB ()
defer db. Close ()
model. SetDB (db)
db. DropTableIfExists ( model . User {}, model . Post {})
db. CreateTable ( model . User {}, model . Post {})
}
我们先在mysql中创建 go-mega
的数据库
Copy $ mysql -u root -p
输入密码后
mysql> create DATABASE go-mega;
然后运行
Copy go run cmd/db_init/main.go
本小节 Diff
初始化数据库数据
model/utils.go
Copy package model
import (
"crypto/md5"
"encoding/hex"
)
// GeneratePasswordHash : Use MD5
func GeneratePasswordHash (pwd string ) string {
hasher := md5. New ()
hasher. Write ([] byte (pwd))
pwdHash := hex. EncodeToString (hasher. Sum ( nil ))
return pwdHash
}
model/user.go
Copy ...
// SetPassword func: Set PasswordHash
func (u * User ) SetPassword (password string ) {
u.PasswordHash = GeneratePasswordHash (password)
}
// CheckPassword func
func (u * User ) CheckPassword (password string ) bool {
return GeneratePasswordHash (password) == u.PasswordHash
}
// GetUserByUsername func
func GetUserByUsername (username string ) ( * User , error ) {
var user User
if err := db. Where ( "username=?" , username). Find ( & user).Error; err != nil {
return nil , err
}
return & user, nil
}
model/post.go
Copy // GetPostsByUserID func
func GetPostsByUserID (id int ) ( * [] Post , error ) {
var posts [] Post
if err := db. Preload ( "User" ). Where ( "user_id=?" , id). Find ( & posts).Error; err != nil {
return nil , err
}
return & posts, nil
}
Notice: 特别注意这里的 Preload, 相当于预先的 Join Table,不然取得的 posts 就没有 User 信息
cmd/db_init/main.go
Copy package main
import (
"log"
"github.com/bonfy/go-mega-code/model"
_ "github.com/jinzhu/gorm/dialects/mysql"
)
func main () {
log. Println ( "DB Init ..." )
db := model. ConnectToDB ()
defer db. Close ()
model. SetDB (db)
db. DropTableIfExists ( model . User {}, model . Post {})
db. CreateTable ( model . User {}, model . Post {})
users := [] model . User {
{
Username: "bonfy" ,
PasswordHash: model. GeneratePasswordHash ( "abc123" ),
Posts: [] model . Post {
{Body: "Beautiful day in Portland!" },
},
},
{
Username: "rene" ,
PasswordHash: model. GeneratePasswordHash ( "abc123" ),
Email: "rene@test.com" ,
Posts: [] model . Post {
{Body: "The Avengers movie was so cool!" },
{Body: "Sun shine is beautiful" },
},
},
}
for _, u := range users {
db. Debug (). Create ( & u)
}
}
运行
Copy $ go run cmd/db_init/main.go
本小节 Diff
完善view
现在我们的数据库里有了数据,我们就可以直接从数据库中取得数据,生成 index 的 viewmodel 了
修改 vm/index.go
的 GetVM func, 从数据库中获得数据
vm/index.go
Copy ...
// GetVM func
func ( IndexViewModelOp ) GetVM () IndexViewModel {
u1, _ := model. GetUserByUsername ( "rene" )
posts, _ := model. GetPostsByUserID (u1.ID)
v := IndexViewModel { BaseViewModel {Title: "Homepage" }, * u1, * posts}
return v
}
main.go
Copy package main
import (
"net/http"
"github.com/bonfy/go-mega-code/controller"
"github.com/bonfy/go-mega-code/model"
_ "github.com/jinzhu/gorm/dialects/mysql"
)
func main () {
// Setup DB
db := model. ConnectToDB ()
defer db. Close ()
model. SetDB (db)
// Setup Controller
controller. Startup ()
http. ListenAndServe ( ":8888" , nil )
}
main.go
要初始化数据库连接,不然会报错。
另外 import _ "github.com/jinzhu/gorm/dialects/mysql"
确定你要使用的是 mysql
的 dialect
本小节 Diff
Notice: 由于 Gorm 的 auto migration 并不像 SQLAlchemy 那么强大,我们在使用的时候要十分小心,这里我就直接没有使用(一般项目会预先定义好数据结构,而且后期修改也可以通过SQL操作),如果有兴趣的同学可以去看下 Gorm 的文档,还是有部分的 Migration 的能力的。
Links